Getting started with Flash and PlayerIO
So you've decided to build Multiplayer games using PlayerIO. Great!
In this document we will show you how to setup the development environment, compile and run one of the example games and release said game to the Internet for everyone to enjoy.
Step 1, Installing the development environment
Before we do anything else, we need to install the applications we need to develop games. To use the PlayerIO SDK we will need Flash CS3 or newer and Visual Studio C# Express Edition.
Adobe Flash CS3+
Start by downloading a 30 days free trial of Adobe Flash from Adobe's website at http://www.adobe.com/go/tryflash. When done downloading, simply double-click the executable and follow the instructions to install.
Visual Studio Community 2019
Next we need to install Visual Studio C# Express Edition. Start by downloading it for free at https://visualstudio.microsoft.com/vs/. When done downloading simply double-click the executable and follow the instructions to install.
Step 2, Downloading the PlayerIO SDK
Having installed the applications we need, we are now ready to download the development package.
Point your browser to https://playerio.com/download/ and download the SDK. When we’re done downloading. Extract the .zip file and and navigate into the contained "Flash" folder.
The folder should contain a few example game folders, a NewGame folder and a few other files that helps you get started. Each of the folders represents an example game. Our goal, in this guide, is to get Fridge Magnets running so open the folder
We now see the following files and folders:
-
Flash
This folder contains all the files related to the client.
-
Serverside Code
This folder contains all the files related to the server.
-
Getting Started.txt
A text file describing how to get started.
-
Flash.flp
This is a Flash CS3 project file.
-
Serverside Code.VS2010.sln
The are Visual Studio solution for the serverside code.
That’s it! We have all the files you need!
Step 3, Registering a user and creating a game on PlayerIO
Before we can run our first game, we need to create a developer user at the PlayerIO website. Don’t worry, it’s completely free!
Creating a user
First go to https://playerio.com/register and fill in the fields. Then press sign up. This will take you directly to the Control Panel.
Don’t worry if you accidentally navigate away from the Control Panel. Simply go to any https://playerio.com site and click the Go to Control Panel link in the top right corner.
Creating a new game

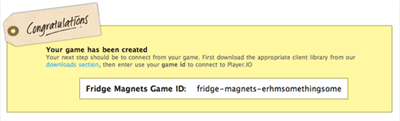
Press the button called Create New Game and fill in Fridge Magnets in the Game Name input box. Then press the button called Create Game.
Congratulations, you have now created a user and configured your first game. Copy the Fridge Magnets Game ID to your clipboard, as we need it later.
Game IDs are unique and are used by the servers to distinguish between all the different games.
Step 4, Running the development environment
We now have everything we need to start developing our first game.
Running the server
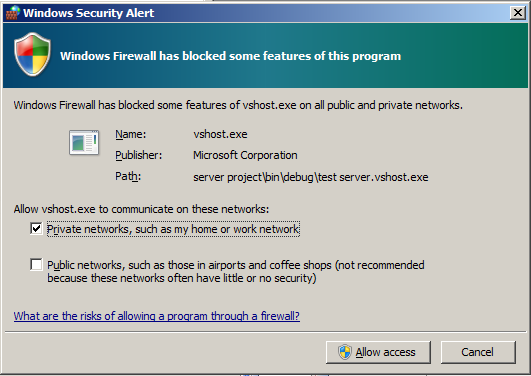
First we want to open, compile and run the server, so double-click visual studio solution file (Serverside Code.VS2010.sln). This should start Visual Studio and load the solution. When the solution has finished loading we simply compile and run the server by pressing F5.
The server will try to listen to several ports on your computer, so you might get a firewall dialog like the one to the right. If so, simply press Allow access button.
Congratulations! You are now running a working development server on your local computer!
Running the client
In the folder Flash, open both FridgeMagnets.fla and FridgeMagnets.as using Adobe Flash. At the top of FridgeMagnets.as we will find a call to PlayerIO.connect similar to
Remember the Fridge Magnets Game ID we put in our clipboard? We need to replace the text [Insert your game id here] with this id. The result should look like:
Make sure you override everything inside the quotation marks "", including the square brackets [].
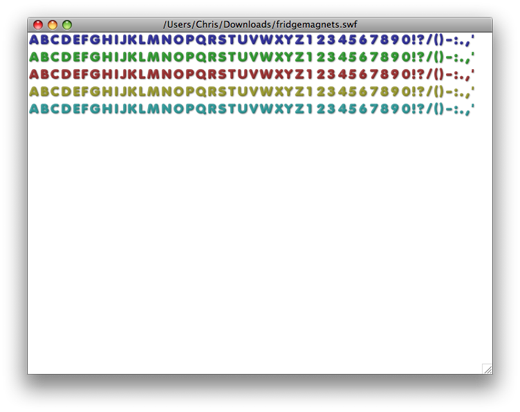
Now save FridgeMagnets.as and press Ctrl+Enter. This will compile, then start our flash file. The game should open up and after a short while you should see a window similar to this:
Fridge Magnets is a multiplayer activity where people can rearrange letters on a virtual fridge. Drag the letters with your mouse to move them.
If you focus FridgeMagnets.fla and press Ctrl+F12 the example will start in a browser. Open several browser windows with the game URL to see that the game is indeed multiplayer.
Congratulations your first multiplayer game is now running on your local computer!
Step 5, Going live
So everything is working as expected but we would really like to share our game with our friends. To do this we need to release the game to the Internet. PlayerIO will host our server-side code but for now we will have to host the SWF file yourself or use a SWF hosting site.
The server-side dll is built to the [Project Folder]\Bin\Debug folder, and the client-side swf is inside the Flash folder when compiled.
Uploading the server-side code
Login to PlayerIO and navigate to the Fridge Magnets game we created before. The url should be https://playerio.com/admin/games/view/fridge-magnets
Now we press the Create New Server Type button. Press the select file button and select the FridgeMagnets.dll file. Press upload.
That’s it! You just uploaded your server code to PlayerIO.
Loading the correct DLL on the server
As developers we can upload several different DLL’s to PlayerIO. Therefore we need to tell the client what DLL it should connect to.
To specify the DLL we find the code block that looks like:
Then insert FridgeMagnets where it says currently says bounce.
We are now loading the FridgeMagnets DLL we uploaded to PlayerIO in the previous step.
Connecting to the production servers
Before we can upload the SWF file to the Internet we need to make a few changes to the client.
First we need to ensure that the client connects to the production servers. To do this we find the below line in FridgeMagnets.as
This line tells the swf file to connect to the development server. Comment it out to connect to the production servers.
Uploading your client to the Internet
Having completed the above two steps we are now ready to upload our game to the Internet. However before we upload the client we need to recompile it. Press Ctrl+Enter to compile the client.
If everything works as it should, the game should simply show up again. The big difference is that we actually just connected to the live servers.
Now just upload FridgeMagnets.swf to your favorite SWF hosting service. Might we suggest our own GameFS?
Congratulations, you now have a fully working development environment and you should know how to upload your compiled server files to PlayerIO!