Building Flash Multiplayer Games
This tutorial is also available in a pure flash version..
| Table of contents | |
|---|---|
| 1 - Introduction | 8 - Synchronization |
| 2 - Game Basics | 9 - Interpolation |
| 3 - Turn Based Games | 10 - Latency |
| 4 - Network Architectures | 11 - Tips & Tricks |
| 5 - Security | 12 - Game: Turn Based |
| 6 - Example Game | 13 - Game: Realtime uninterpolated |
| 7 - Real Time Games | 14 - Game: Realtime interpolated |
Introduction
The contents of this tutorial is also available in a flash-only version here which is great for quick browsing.
Why Multiplayer Games?
I'm going to throw a few terms are you here. Are these descriptors that you want to be used to on your games? Dynamic, engaging, filled with new challenge, new experience and most importantly of all, feels rewarding when it is played.
Until humankind develops the perfect AI, single player games cannot match their multiplayer counterparts in these areas. The important part of any multiplayer game is the people. The people you laugh with on victory and cry together on defeat. Interacting with other people alone can be compelling enough (chatrooms can draw people for hours!) but imagine what you can do when you allow the players other interactions as well through your game.
Multiplayer games tend to have a longer life as well. If the player wants a new experience, instead of switching games, they can just switch opponents and suddenly it's like a whole new game, Different people provide the diversity to keep a game interesting far beyond the content that you create.
If you have ever taken a moment to stop and think about the evolution of multiplayer games, it's actually quite amazing. Long gone are the days where you actually need friends in close proximity to play a game! Compare today's "online in 5 seconds" atmosphere compared to yesterday's board game dependence. Other people are more accessible then ever before. Strangers from halfway across the world will play chess with you when none of your other friends are willing.
This environment is still accelerating. Every day, more and more people log on, with an appetite for online games. They wish to meet new people and have new experiences all from the comfort of their keyboard. These/ millions of people look to game designers like us to sate this growing appetite and save them from family board games night for something even better.
This is why we create multiplayer games.
What do I need you make multiplayer games?
 This tutorial is
focusing on in-browser games created with adobe
flash. I recommend you buy it. It has a hefty price tag but
you can make quite a large amount of money with it, so it easily pays
for itself. If you are unsure of your commitment, you can
get the 30 day trial to try everything out.
This tutorial is
focusing on in-browser games created with adobe
flash. I recommend you buy it. It has a hefty price tag but
you can make quite a large amount of money with it, so it easily pays
for itself. If you are unsure of your commitment, you can
get the 30 day trial to try everything out.
All examples in this tutorial will use ActionScript 3 (AS3) and will be made using flash CS3. If you only know AS2, do not fret, you should be able to still understand most of the code and all of the theory. You will not be able to hide from AS3 forever, though. Make the jump as soon as you can.
That being said, the rest of the tutorial will be written assuming you know your way around flash and can code in AS3.
Flash isn't the only thing we need to make an online multiplayer game, however. We still need a second piece of the puzzle.
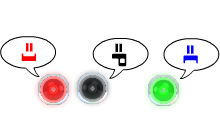
At the time of this tutorial (2009), flash games cannot directly communicate with each other. Of course, this is a big problem when you're trying to create a multiplayer game! If our players cannot communicate with each other, there can be no game! The solution is to communicate indirectly through a server. This server will interpret and relay the information you send it to other clients (each player is referred to as a client in this type of network)
This means we need a server! And not just a simple cheap html server either.... To the startup multiplayer developer, this can be a very large hurdle...
The server
Renting or even buying the proper server is a very large commitment! You must manage it, ensure that it doesn't go down, protect it from attacks, scale your network resources up as the game gains popularity, code the low level systems and communication... etc.

In short, as indie developers we don't want to run our own servers! We'd have to do it ourselves or hire someone to do it for us which would require quite a bit of time/money! This is where PlayerIO steps in. PlayerIO provides a multiplayer API(a platform) which can be used to create multiplayer games! PlayerIO will handle all the above for you which makes it perfect for the indie developer to use. There isn't any burden of commitment placed on you, which is a major concern for the prospective developer.
Using the API
Of course, you're wondering how one goes about using this API. There are a couple simple things you must do. First, we must download and install the PlayerIO API from the PlayerIO site. This provides us with a testing server and all the backend code for their service. Visit the download page and download it.
Save it anywhere you like, then unzip it open it up so you can see it's contents. Ignore all sub-folders except NewGame for now, Those are other example games that you can look at later for reference. Dive into the "New game" folder. This is where you will create your game.
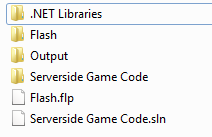
You will see 4 folders and 2 files. These folders and files contain all the code necessary to emulate a multiplayer game using your computer as a virtual server. (meaning you can test without connecting to outside servers)
The first folder, "Flash" contains your flash files. This contains your .fla and all your .as files (If you are not familiar with these types of files, I will touch on them later.) There should not be many surprises coming from this folder.
The ".NET Libraries" folder is the server backend. You do not need to touch any of this. (and it is recommended you don't!)
The "Output" folder is where your .swf and .dll will appear if you use the template that PlayerIO provides (recommended!)
Last is the "Serverside Code" folder. We will need to spend a bit more time with this as there may be a few things you are not familiar with.
Serverside code
The server is not a dumb entity. It has many responsibilities that we will discuss later. To make our server act the way we wish, we must write code for it. Unfortunately, we cannot use actionscript to code on the server, it is ill-suited for such a task. We must use a real language instead. PlayerIO uses C# for it's serverside code, which is nice because it has very large similarities to AS3.
AS3
C#
If you are afraid to learn C#, or you are just plain unwilling, there is a way to code using only flash that we will present later on in the tutorial (Peer-to-peer systems).
Developing with C#
Just like Flash, C# has a development environment of it's own. It can be downloaded and installed from here. (Don't worry, it's free!)
Once you have everything installed, return to our NewGame folder and open up the C# project named "Serverside Game Code.sln". This will open up the proper files from the serverside code folder (you never have to manually browse through there if you don't want to) and you will see the PlayerIO serverside template.
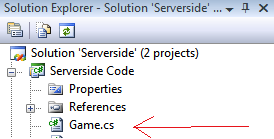
Open up "Game.cs" from the solution explorer on the right (it's under view if you can't see it) and you will see some heavily commented code. Do not be alarmed if everything doesn't seem to make sense at first (especially if you are new at C#). The template is actually very simple and straight-forward. Later in the tutorial we will also give an even simpler template.
Read through the comments on the code and identify the major functions:
GameStarted() (Functionally equivalent to flash's onLoad), GotMessage() (called when the server receives information from a player) and finally, the UserJoined() and UserLeft() functions. These are all the tools you need to make a multiplayer server run properly.
The proper documentation for the PlayerIO C# code can be found here. This gives very detailed info about how this setup works and all the features that it contains. Although, I will introduce all the critical parts through examples.
When you're ready to run your test server, just hit the green arrow at the top. You'll see the server dialog pop up and it will wait for your flash game to connect. You can go into the flash folder and open up the example file to test this out.
PlayerIO and flash.
Remember those .as files we mentioned before? This section is where we are going to talk about them. They are nothing scary and they are terribly useful because they make platforms like this possible.
For simplicity and to be kind to the less experienced coder, I am going to give examples coded on the timeline only for this tutorial and avoid .as files. Although it's not a good habit, it creates a better environment for learning.
So, without ado, here is the long convoluted process required to use PlayerIO's .as files. You put this code on the first frame before any other code.
Now, you are able to use PlayerIO's pre-built features such as the connection object (connects and lets the user login) and connection.Send(message) (sends information to the server). All that this line does is grab all the code from the various .as files and make it available to you to use in your game.
If you want to see all the different PlayerIO functions you can call, visit the client-side documentation here. In addition, PlayerIO has detailed much of the workings of their supplied lobby and chat in their getting started page as well.
You should take a bref look over all the functionality that is offered, if only to know what exists so that you may come back to it when you need to use it.
From the flash perspective, the basic functions that are required to make a multiplayer game run are connect(), createJoinRoom() and connection.send(). You should take a bref look over all the functionality that is offered, if only to know what exists so that you may come back to it when you need to use it.
Now it is time to give a simple example of how all these functions work together to let us share information with the outside world....
| Table of contents | |
|---|---|
| 1 - Introduction | 8 - Synchronization |
| 2 - Game Basics | 9 - Interpolation |
| 3 - Turn Based Games | 10 - Latency |
| 4 - Network Architectures | 11 - Tips & Tricks |
| 5 - Security | 12 - Game: Turn Based |
| 6 - Example Game | 13 - Game: Realtime uninterpolated |
| 7 - Real Time Games | 14 - Game: Realtime interpolated |

About the author
Ryan Brady is a Canadian developer who is currently going to the university of Waterloo. When he isn't fooling around with friends or dealing with an ungodly amount of course work, he likes to design and build games.
Two of the things Ryan likes most above all else are sarcasm and irony. Thus, he likes other people when they have a sense of humor and don't take offence at playful stabs and teasing. Otherwise, people tend to think Ryan hates them and/or the entire universe.
Subscribing to the "Work hard, Play hard" mindset, Ryan is always on the move. There are not enough hours in the day to do everything he wants to do (which is quite a bit). As a habit, Ryan designs more things then he has time to make. Alphas and proofs of concepts are his bread and butter though he always wishes he could make them into full games.
Every so often, you will see Ryan with a full beard on his chin. This commonly refereed to as Schrodinger's beard as you never know if Ryan will have it when you see him next. He re-grows it in under a week.
Every 4 months, Ryan has a co-op term so he moves around quite a bit. He might be living in Canada one month then be living in San Fran the next. You will never know when Ryan will be at large in your area next (until it is too late).